Monday 31 December 2012
What's with the Name, “Visionete Artdevel”?
The deeper intention was to encapsulate what the project is about:
graphic music videos whose visuals render an interpretation of the
musical structure of the accompanying sound track.
Nete was one of the three original ancient Greek Muses. As these
classical femmes fatales lured voyagers — to their doom should they
succumb — by the charm of their art†, Nete played the bass strings of
the lyre. Regarded as the Muse of song, variously known as Nete,
Aoide or Cephisso, the lowest note of the lyre was named after her.
The bass normally plays a deep structural rôle in terms of harmony.
I feel irresistibly drawn to her…
Thus we have it, Vision–Nete, with elision on the N. Classical
scholars may demur at the incongruity of Latin and Greek etymologies,
to which I can only counter, hey, this is word play, not a work of
scholarship. ☺
On the face of it, I guess Visionete suggests a diminutive of
vision. If the reader will pardon an element of self-parody, this
could apply to the realization of this project in its early stages,
compared to where it could potentially (hopefully…) go. That said,
it could also be a concession to reality.
Artdevel, pseudonymous surname, is meant to be a contraction of art
of development (be it mathematics, code or artwork) or a nod to the
process of developing art. Again on the surface, there may be an
askance allusion to art devil — as in dæmon for art, or even Mann's
Faustian Leverkühn. If so, I'd take it wryly with respect to mental
health caution as creative/artistic/original thought often involves
considerations against the grain of the mainstream.
† Incidentally, the word music derives from ancient Greek,
art/craft of the Muses, where the latter syllable, τεχ,
is the familiar stem in technique, technology, etc.
Sunday 12 August 2012
Here's One I Made Earlier
Lately, I've been busy Haskelling away, writing code that is, with a view to realising various music video projects in the pipeline. It's taking shape nicely, with increasingly more code factored out into libraries that can be shared or substituted in due course.
Made with Macromedia Shockwave (later to become Flash), this was unusual for its time.
In the meanwhile, so as not to loose all momentum of posting here, a graphic music video I made (somewhat...) earlier:
Made with Macromedia Shockwave (later to become Flash), this was unusual for its time.
Monday 9 April 2012
Just a Note!
How could an eleven-second rendition of a single note score five-figure hits on
YouTube?
A couple of years ago, I was developing the rendering end of a system for
producing animation from digital graphics. As a means to test it, I tried to
imagine the simplest pilot project that could have real matching audio and video
content. I wondered, “what could be done with just a single note?”
Devoid of melody, harmony, and rhythm, this struck me as an amusing challenge.
There would be only one main event: the attack of the note onset. The decay
phase of the note suggested a waveform diminishing in amplitude. Attack, decay,
and nothing else, might seem a little pointless, lacking in context, so to
induce some anticipation, a reverse waveform could precede the attack as some
sort of build up.
I wanted the decay to seem natural, like ripples on the surface of a pond
receding into the distance. To render this in a 2-D frame, I imagined wave
projection onto the surface of a paraboloid - with apex closest to viewer,
damped oscillation would appear further, smaller, and denser as it emanates from
the apex.
Well, I never expected this offhand proof-of-concept pilot to turn out to be so
popular, with >11,500 hits to date. The original has got 1000 hits in the last month
alone! In response, the above is a revised version. For best effect,
view in fullscreen at 1080p.
Wednesday 14 March 2012
Divertimentino #1 — A Whimsical yet Listless 1-Minute Piano Piece
Background
The requirement arose for a keyboard piece of about one minute in
duration, one that would have visual appeal to watch being played, and
with a varied, contrasting feel to it. Accordingly, this short piano piece
features crossing of hands, arpeggiated flourishes, use of the full range
of the keyboard, and some fast and tricky passages.
Technique
tonal harmony and B akin to jazz or blues.
The opening and closing bars employ a Chopinesque use of 6th
chords to perpetuate a complex harmonic tension — one which carries a
rich scope for modulation and one which is only ever relaxed at macro-
structural cadences. Jazz/blues harmony emerges as an extension of this
tonality.
Orthogonal and complementary to this scope for harmonic freedom,
the metrical subtlety offered by the compound 6/8 time allows a natural
transition from classical triplets to jazz swing.
While the opening and closing passages make use of lyrical runs of
scales and arpeggios, contrast is achieved by the use of dissonant
chordal jumps in the mid section.
The opening bar lays down a pattern of harmonic tension and, via
parallelism, opens space for the melody to fill in the third and sixth
quaver beats of subsequent bars. Although the piece aims to pack a
range of motifs quite densely, overall coherence is maintained by the
metre, by the overarching harmonic structure, and by the parallelism of
the left hand pattern and the right hand melodic contour.
Mood
A hesitant, listless opening turns into a forthright, impetuous blues
shuffle. As the familiar chord cycle approaches its end, dissipation
encroaches. The melody continues searchingly and restlessly, almost as if
to ward off a looming peripheral sense of dissipation, perhaps in a bid
to avert the return of the initial listlessness. Tension played out, the final
cadence lays the piece to rest.
Sunday 4 March 2012
Blackboards and Creativity
I have a thing about blackboards and creativity. Perhaps it's the old-school mathematician in me. I guess I have a thing about coffee and creativity too. I had mixed feelings about Dublin Contemporary 2011, but I did get this great mug there:

This shot arose from a Sunday morning musing, over coffee, about a scale for a piece. A composer friend of mine queried the spelling of the D♭/C♯ on Google+, so here is a demonstration of the power of being able to edit your thoughts as the ideas take shape:

I guess it also shows how ideas evolve from sharing in a suitable environment.
Opening a Time Capsule — Revisiting my First Composition
Tεχνίκα
Background
During my maths undergrad, I joined the music soc. at uni., which
gave me access to a piano for the first time in seven years. I started
practising classical pieces and improvising like a fish that had been out
of water for too long. I wrote my first complete piece of music. It was
1996.
Listening back to it now, it’s like a time capsule for how I felt at the
time. I’d been practising Chopin and Debussy, and it’s amusing now to
hear their influence in this piece. I’m not sure that anyone composes
in those styles any more. This was before I went on to learn about
contemporary classical music.
Technique
The piece opens with a motif statement: a modal progression through
four chords. This motif is the kernel for the whole piece.
Four sections follow: individually each one consists of the same chord
progression as the motif, and together the four sections correspond to the
four chords in sequence. The second is downcast relative to the first.
The third is brighter and upbeat relative to what has gone before.
The fourth is resigned but unresolved, and anticipates a return to the first.
A restatement of the motif serves as a coda.
As such, the piece is self-referential (I’d been reading up on AI at the
time) in that the relationship between the four sections is an elaboration
of that of the four chords to one another. The trick is that each chord
of the motif gets rendered in the mood of each of its constituent chords!
Mood
The cyclic switch, from downbeat to hopeful outlook to resignation,
resonated strongly with me at the time. When I hit on the opening
theme, I felt I had to explore it, to work to make something out of it.
The devised technique was a means of exploring the theme from each
of its vacillating vantage points.
Sunday 29 January 2012
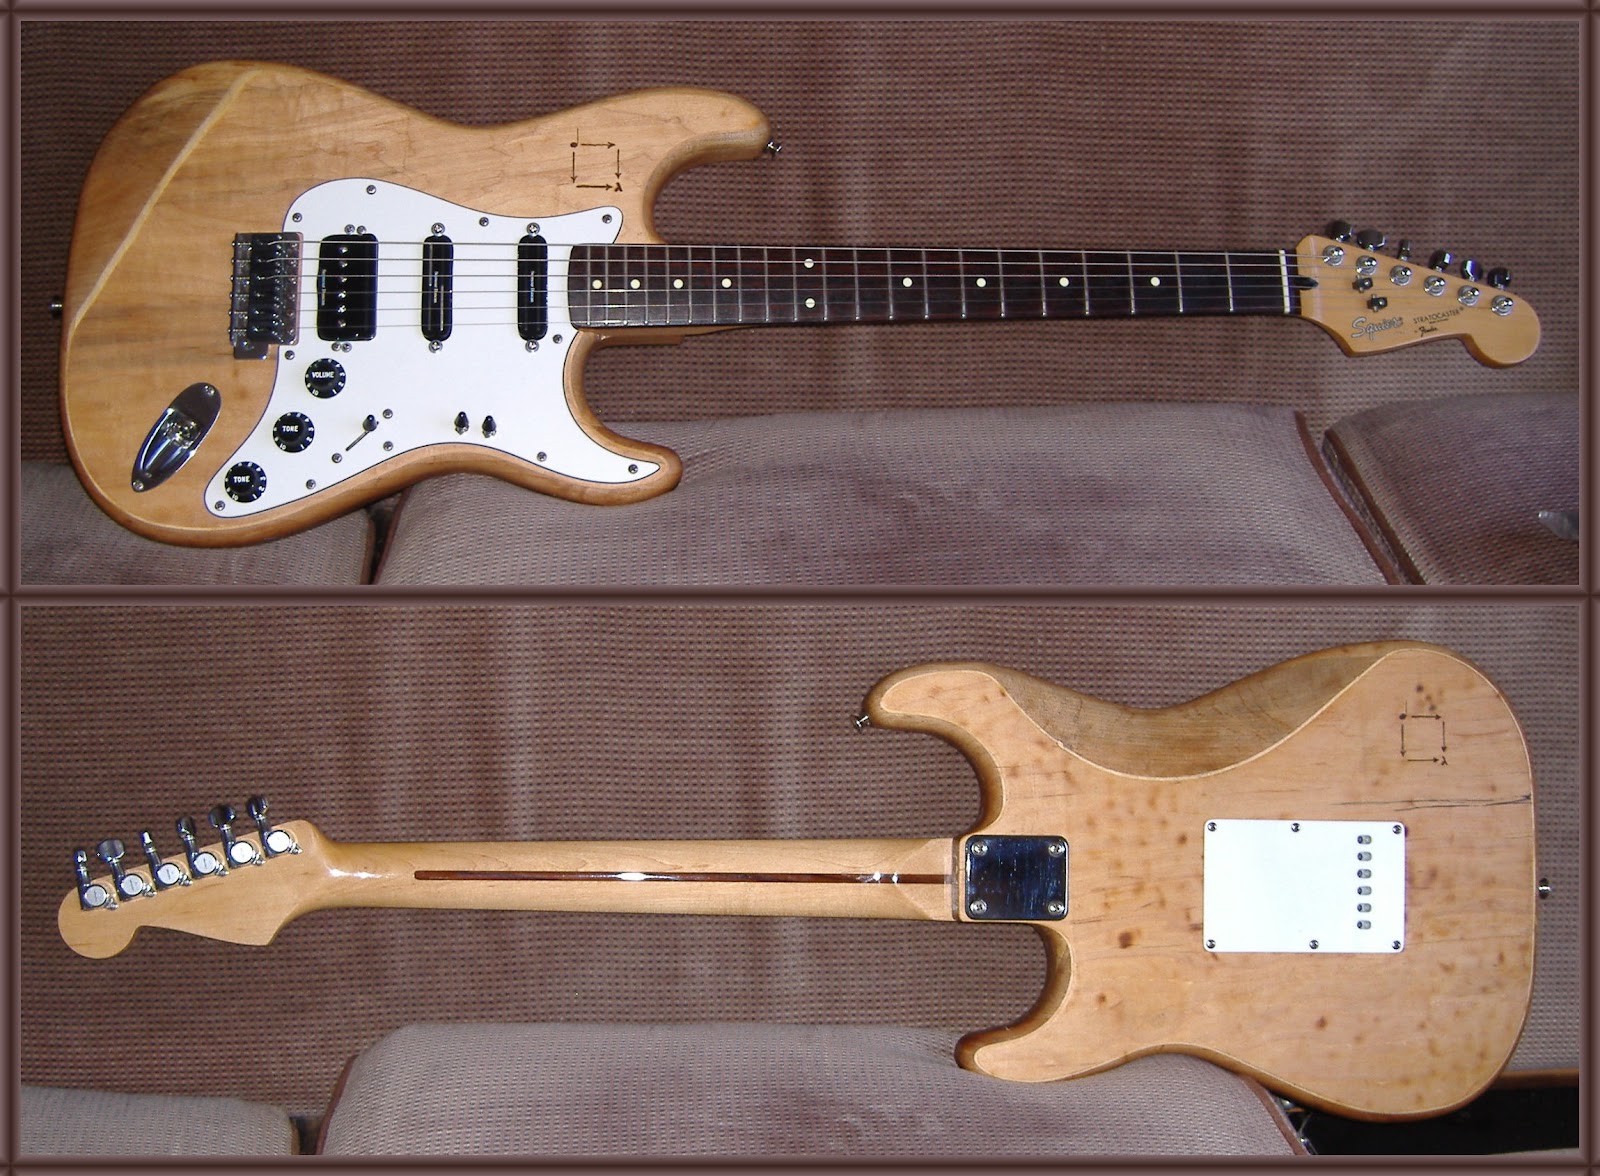
Zen and the Art of Guitar Customization
In 2010, instead of trekking off abroad for a holiday, I spent the
time and money on a hobby project: to customize the first guitar I'd
bought, twenty-five years ago. For nearly two decades, most of my
projects had been worked out either in my head, on paper, or with a
computer. I felt curious to revisit some old engineering skills.

 |
| Before... |
 |
| ...After |
I always liked the neck, slim and straight and comfortable to play.
The Gotoh machine heads are silky smooth: accurate tuning has always
been pleasantly easy. I liked the range of tone colour available from
the Strat configuration of pickups and selector switch. I liked the
shape of the Strat body. That's about it.
Just about every other aspect of the guitar, I didn't care much for.
The pickups were cheap and sounded so. I never liked the Strat
bridge. The whammy bar produces a very non-musical vibrato and is
only good for sound effects, but the floating bridge to accommodate
this gimmick cannot hold strings in tune properly. If a string is
bent, any other notes sounding go horribly flat as the bridge yields
to the added string tension. While one string is being bent or tuned,
others may slip over the saddles and out of tune as the floating
bridge shifts about. The lead jack had got a bit loose and no longer
made snug electrical contact. I didn't like the hackneyed appearance
of it, and red was never really my colour. The screw heads, pickup
pole pieces, and bridge saddles had corroded over the years. Worst of
all, the guitar had never been wired or shielded correctly: it used to
buzz very loudly, had poor sustain, would pick up loud interference
from lights and cell phones, and this buzzing would get worse when the
strings or other metal parts are touched.
The driving motivation was to improve all the electrics: to rewire it
properly, to shield all the electronic components from noise, and to
change the pickups for ones I liked. Once I had decided to do this,
it was a small step to make a renovation cum customization project out
of it. For the time, effort and money I was prepared to spend at the
outset, I knew I could have got a new guitar, better than what I had,
but I was rather attached to the good components and the idea of
personalising the instrument grew on me, the more I considered it.
Preparation
Sourcing all the parts and materials took a couple of months. The
pickups were crucial. If I could get ones I was happy with, the
project was going ahead; if not, the motivation would have remained
below critical mass.
Seymour Duncan make high-end pickups for guitars. I spent several
happy self-indulgent hours, glad no one was watching me "nerd out",
auditioning the audio samples of various pickups in different body
positions from their website. Once decided on the ones I wanted,
I was committed to the project - now I really wanted these pickups!
I was living in Dublin at the time. No music shop in the city could
provide any of the ones I wanted. No shop I could find in the UK
stocked them either. Absolute Music in the UK did offer to order them
for me though, from the US, if I was prepared to wait "several
weeks". They couldn't give an exact date, but this seemed like my
best option. I ordered several items from Absolute Music, at other
times as well, and I have to say they were helpful and pleasant to
deal with. There are certain music shops in Dublin I could not say
the same of, despite being significantly less competitive in price.
I went for three particular humbuckers, chosen for their versatility
as a set and for their suitability for the styles of music I like to
play. Mainly, I didn't want output so hot that the dynamic range gets
compressed. I'd grown a tad tired over the years of the thin,
phasing, twang of the Strat sound. It works well in a band context
for certain styles of music, but less so for ongoing solo practise.
I'd come to almost envy the rich, fat, rounded tone of the Les Paul.
Humbuckers should help to cure the noise issue, I reckoned. Having
decided on the pickups, I had the luxury of being able to design a
wiring scheme of my choice. The twin coils of a humbucker can be
wired in series, in parallel, or tapped as a single coil - each giving
a distinct timbre. By providing enough switches, all the options
become available: from rounded humbucking tone, to classic Strat
phasing, to more esoteric alternatives. I settled on being able to tap
the neck pickup, switch the bridge coils individually, and flip
between parallel and series on the bridge windings. I retained the
usual five-way Strat selector switch and the tone pots for neck and
mid positions.
Copper foil for electromagnetic shielding turns out to have very few
retail suppliers worldwide that I could find. In fact, I didn't find
any by the time I started into the physical work, so I used kitchen
aluminium foil. The other materials, components and tools required
are all available from good hardware, electronics, or guitar parts
suppliers.


For the body, I decided to go for the natural look: to strip the paint
altogether and leave the wood visible. I was hoping for some wood
with a pleasing natural grain. I decided on linseed oil to finish the
wood, if should work out, for the natural look and satin feel it
gives. If this didn't work out, if the body turned out to be ugly,
badly cracked or otherwise unsuitable, or if I botched the stripping,
the contingency plan was to buy a new body with an aesthetically
pleasing grain pattern. With this backup plan in place, I felt more
confident to try my hand at pyrography by scorching the visionete logo
into the wood. Once the complete instrument was physically and
electronically sound, I didn't mind if the result was a bit homemade
or grungy looking - if anything, this was the sort of look I was
aiming for.
Physical Work
Disassembly took only a few minutes. It felt rather weird unbolting
the neck from the body as I've always been conscious of how this joint
is a crucial stress point, always handling the instrument carefully with
this in mind. I'd never done anything quite like this before, and from
here on there was no turning back...

Paint Stripping
Stripping the paint from the body took about a week, substantially
longer than anticipated.
Although chemical paint removal would have been much faster, I decided
against it - mainly because I didn't want to risk delamination by
chemical paint stripper seeping in between any plies or joints, or
into any cracks there may be in the wood. (At this point, for all I
knew, it could have been cheap plywood, fibreglass, or papier-mâché
underneath!) As it turned out, there was a layer of epoxy between the
paint and wood, quite thick over much of the body surface, so I'm not
sure how far I would have got by chemical means.
Similarly, I didn't want to use an orbital sander or similar for risk
of damaging the surface. Due to the age, there was a risk of lead
content so inhaling toxic dust was also a negative factor. The
curvature of the body also meant that flat sanding alone could not
have completed the job.
I used a hot air torch and scraper to remove all the paint and epoxy.
The Fender factory paint finish was practically flawless after a
quarter of a century, with all the glossy lustre of the day I'd bought
it, but it was time for it to go. The paint was quite thick and
durable - I daresay it would have lasted for a hundred years. There
is a bit of skill that I had to learn to employ the hot air and
scraper technique without damaging the surface underneath. It
reminded me of oxy-acetylene welding in the way that the torch has to
be danced gingerly about the surface so as to heat it locally without
overdoing it. Once you begin to overdo it, the surface destroys
almost immediately. The temperature band between hot enough and too
hot is quite narrow. I practised on the back, where I discovered the
underlying layer of epoxy resin, up to 3mm deep in places. The wood
reaches scorching temperature much more quickly than the paint & resin
attain a sufficient scraping-off temperature, I discovered. So as not
to damage the surface, I had to proceed carefully and slowly. There
are some blemishes on the back (working outdoors to enjoy the sun and
reduce fume inhalation, fluctuating ambient temperature and breeze
were offsetting my judgement), but eventually the bare wood was fully
exposed.

I was pleased enough with the results uncovered: a combination of soft
wood veneer for the flat surfaces front & back, hard wood for the edge
contours (which would be more likely to receive occasional knocks in
practice), and pretty nice grain all around. Where the veneer bevels
into the outer contour of hard wood, its edge forms a light band that
highlights the contour nicely. It wasn't a single piece of wood but
the joints had been well made. There had been some splitting evident
at the outset that turned out to be pretty minor and acceptable - the
new finishing should prevent moisture ingress and further
deterioration. There were a few spots where gaps caused by knots in
the wood had been filled with synthetic compound. Under the resin and
paint, this hadn't mattered; now these blemishes were exposed. Oh
well, this was in keeping with the DIY look I had envisioned.

There remained a smattering of tiny epoxy particles all over the
surface. I tried to remove them with a strong solvent, but
immediately gave up on this approach: dissolving the resin does not
remove it but rather drives it into the grain of the wood! The spot
on the back where I tried this had to be sanded down below the
original surface to accept finishing. Careful work with a sanding
block, a keen eye, and a sensitive hand finally readied the outer
wood surface for finishing.
The remaining tasks of routing the body, oiling the body, machining
and shielding the scratchplate, shielding the body, wiring up, and
assembly, each took about four hours, as anticipated.
Routing
The pickup cavity for the bridge position had to be enlarged to
accommodate the P-Rails I'd chosen for this slot. It wasn't
designed for a Strat body, but I was an engineer again and I was
going to make it fit.


Having chosen a location for the additional switches, cavities had to
be created to accommodate them under the scratchplate, and a wiring
channel had to be made to link them to the circuit.
Wood Finishing
Three liberal coats of linseed oil were applied with two days'
interval between applications. I left three days for the last coat to
become touch-dry before working on the body again. A mike stand
with a drill bit served as suitable stand, allowing the oil to dry evenly
and undisturbed. Incidentally, if like me you're using linseed oil for
the first time, you need to know that cloths or brushes used should
not be crumpled up nor disposed of normally: spontaneous
combustion can occur!

Although the oil dries to the touch within a couple of days, I reckon
it continued to dry for at least another four months as the colour
continued to darken markedly. I was pleased: as well as a natural
look with a satin texture, the darkening enhanced the contrast of the
grain and it came to match the golden-brown maple of the headstock
instead of the paleness that was first uncovered.
While the linseed oil was drying, I treated the rosewood fretboard
with lemon oil and turned to the scratchplate (aka pickguard).
Pickguard
New holes had to be drilled to accommodate the new switches, and
existing holds had to be enlarged for the pickups and volume knob.
The new neck and mid pickups are designed to fit within a standard
Strat body, but they were slightly too wide for the pickguard. The
mount holes for the pickups had to be created (bridge) or enlarged
(mid & neck). The old volume knob was replaced with an S1 switch
which has American rather than Asian shaft bore.
I was anxious about machining vinyl. I hadn't worked with it as a
material before and I didn't know if it was prone to cracking, how
elastic it would be, did it stretch or work harden, etc. If I botched
it, replacements do not have the same screw pitch as the old Asian one
I had (there have been several layouts over the years) and working
with a blank would involve more work and probably weeks of delay. If
I did botch it, I could perhaps have used a pre-drilled replacement
and made fresh holes in the body, but I suspected that the contour and
cutouts wouldn't match properly anyway. Either way, one mistake
cutting into the pickguard meant a significant setback.
It turns out that vinyl is quite a "well-behaved" material to work
with, prone to burring (easily removed) but otherwise easily cut
accurately into shape if approached gently. Reshaping the
pickguard went smoothly.
Shielding
Using spray adhesive that explicitly warned about unsuitability for
vinyl turned out to work well for bonding the aluminium foil to the
back of the pickguard with minimal wrinkles. (Perhaps the more porous
vinyl variant used in upholstery was what the warning had in mind.)

Shielding the body cavities was a little trickier due to all the
complex contours, but reasonable coverage was achieved. The new
pickups, including their leads, are well shielded, unlike the factory
supplied ones.

Wiring
The five-way selector switch was serviceable and was retained. Every
other electronic component, including wiring, was replaced. High end
components were used throughout, such as an Orange Drop tone
capacitor, Switchcraft jack socket, and Fender S1 combined
switch-potentiometer. An additional capacitor was added for
protection against DC over-voltage.

All grounding (including pickup shields, bridge, and new cavity
shield) was physically brought to a single point, doing away with the
factory supplied ground loops.

Assembly
That bridge, designed to float, was secured flush with the surface
of the body by five new springs (replacing the three old ones),
tightening the claw, and setting the pivot stop screws.
Graphtech Tusq nut and String Saver saddles replaced the stock Fender
parts, for extra sustain and string life.
Tips for the new toggle switches were chosen to match that of the
five-way selector switch. These tips were not designed to fit these
switches but, again, I was an engineer and I was going to make them
fit.
Elixir Nanoweb strings were fitted. String height, truss rod and intonation
were set.

Results
While there now was no audible hum in certain switch & knob
configurations, it was still there in other settings. This was both
affirming and disappointing in strong measures. I had initially
suspected poor earth connectivity somewhere and regretted having used
heat-shrink as it would be more work to unravel. It turned out that
jack reversal was the simple fix, which thankfully didn't require
disassembly. (A subscriber to the "measure twice, cut once" motto for
mechanical engineering, I compared with the notes & photos of the
original wiring: I had correctly reproduced the original jack
polarity, but it had been wired incorrectly from the factory.)
Finally, after twenty-five years, the hum was completely exorcised.
With the guitar at any setting plugged into a Yamaha sixteen-channel
analogue mixing desk, the level of noise from the mixer itself
completely masks whatever noise there may be from the guitar.
So I conclude that the hum can no longer reasonably be measured.
The consequent sustain is incredible, fading away slowly for up to
a minute.
The choice of pickups, switches and pots turned out much as envisaged:
I love how it sounds. I'm pleased with how it looks: a colour scheme of
black, white, golden-brown, and chrome. I feel like it's my guitar to an
extent I never did before - it's design now says some little thing about
what I value. I enjoy playing it now more than ever.
Epilogue
Although I can now sound closer in tone to Paul Kossoff or Jimi Page
with fat mellow humbuckers, I have to admit that there is something specially
effective about the stinging bite of the single coil Hendrix cum SRV tone.
Well, now I can switch between sounds and maybe try to find a voice in
the process. Currently playing a Peter-Green-ish hybrid with a touch
more rock grit...
Acknowledgement
Huge thanks to John at GuitarNuts for the blog on guitar shielding!
Sincere thanks to Maurice O'Brien for knowledgeable advice,
generously given, on paint stripping techniques and related
matters.
Resources
I heartily recommend:
GuitarNuts guitar shielding blog
Guitar Parts Resource
Got a couple of packages sent across the Atlantic with zero fuss and
they both arrived in just a couple of days.
Etronic Parts
Growing Hungarian site. Good for components for amps, guitars, etc.
Absolute Music
Helpful, well stocked, competitively priced and deliver internationally.
Seymour Duncan
Lovely website for pickups. A cheap guitar fitted with high-end
pickups will sound better than a very expensive guitar with poor pickups.
Subscribe to:
Posts (Atom)